
You do not need years of software experience to create a polished first project. You need three things:
A clear vision for the final product
Reliable training materials
A carefully structured AI prompt
This approach works especially well when you already know what you want to create but do not yet know how to build every part of it inside the software. For one Storyline project, the designer already had a complete storyboard, reference images, course content, software manuals and tutorial videos. She knew how she wanted the course to look and behave but what she needed was a customized development guide that translated that vision into small, manageable actions. She essential needed to create her own custom learning course that reduced cognitive load and helped her focus on the skills she needed for just this project.
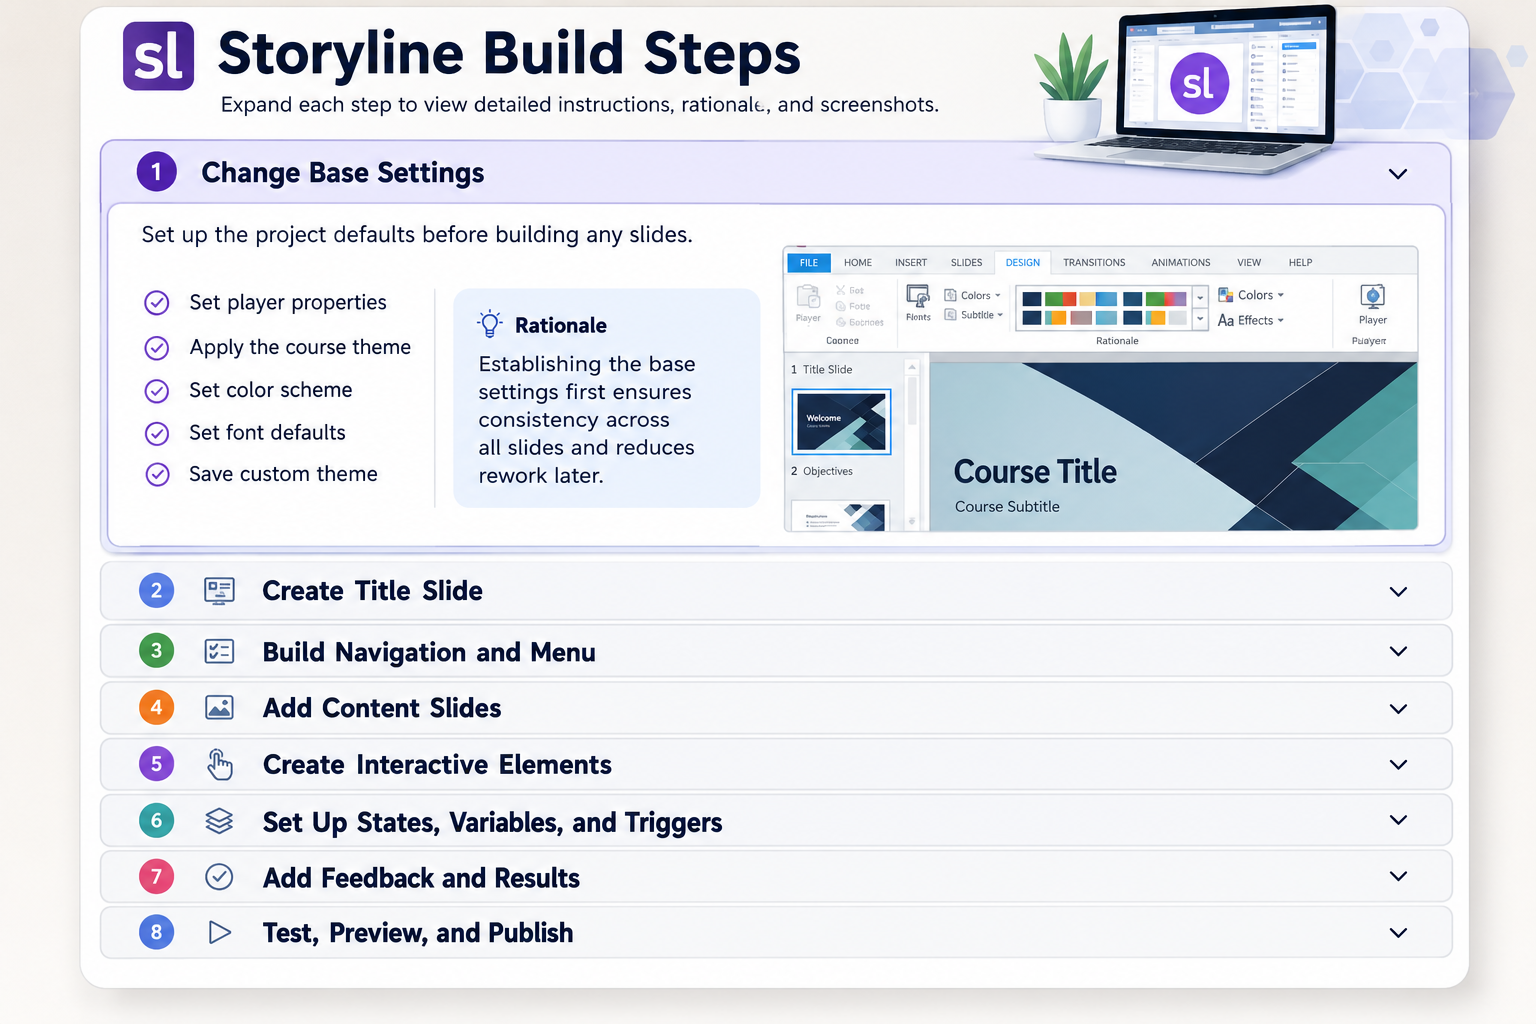
The solution was to use AI to create a slide-by-slide tutorial. Every action was broken into its simplest form, and each step appeared inside its own expandable accordion section. The designer could open one step, complete it, test it and then move to the next.
Here is how to create the same kind of tutorial for your own project.
Step 1: Define the Final Product
Begin by describing exactly what you want to create. Do not start by asking AI how to use the software. Start by explaining the finished experience.
Include details such as:
The purpose of the project
The intended audience
The number of slides, screens, pages or sections
The visual style
The color scheme
The interactions
The navigation
The feedback learners or users should receive
What should happen when someone clicks, selects, submits or completes an action
For the Storyline project, the desired experience included:
A visual emergency scenario
Clickable objects and checklist items
Correct answers that turned green
Incorrect answers that turned red
Checkmarks and X symbols
Variables that tracked correct decisions
A summary layer that appeared only after all correct actions were selected
Navigation that remained locked until the learner completed the required steps
The more clearly you describe the final result, the more accurately AI can translate it into development instructions. AI was not involved in the design process at all, but instead was to give the designer a step by step custom tutorial that she could use to build the course herself exactly how she wanted to, as well as see how advanced features worked within the context of her design.
Step 2: Gather the Source Materials
Collect everything that can help AI understand both the software and the project.
Useful materials may include:
A storyboard
A project outline
PDF user manuals
Official help documentation
Tutorial videos
Screenshots
Reference photographs
Brand guidelines
Color palettes
Sample projects
Existing templates
Notes from meetings
Images that will appear in the final product
Accessibility requirements
Technical specifications
Use official or trusted materials whenever possible. The AI should not be asked to guess how the software works. It should use the manuals and tutorials as its technical reference, then apply that information to your specific project. Be careful not to upload any personal or proprietary information and redact any uploaded documents as necessary.
Step 3: Organize the Files Before Uploading
Rename the files so their purpose is obvious.
For example:
01_Project_Storyboard.pdf
02_Storyline_User_Manual.pdf
03_Interaction_Tutorial.mp4
04_Reference_Classroom.jpg
05_Color_Palette.png
06_Completed_Design_Example.pdf
Clear file names help both you and the AI keep track of the materials. You can also create a short source list explaining what each file contains.
Example:
The storyboard shows the slide order and learner interactions.
The user manual verifies Storyline features and menu names.
The classroom image is the visual reference for Slide 3.
The color palette should be used throughout the course.
The video demonstrates how to create object states.
Step 4: Upload the Materials
Upload the storyboard, manuals, images, screenshots, videos, and other relevant files into the AI tool. You may need to upload the materials in groups if the platform has file limits.
After uploading, ask the AI to confirm that it can identify:
The project structure
The software being used
The intended visual style
The major interactions
The reference materials
The expected final result
Do not ask it to create the tutorial until the files are uploaded and the project has been clearly described.
Step 5: Ask AI to Build the Project Slide by Slide
The tutorial should follow the actual order in which the project will be built. Ask for a detailed outline that you can check over before prompting for the step by step guide.
For a Storyline course, the guide might be organized like this:
Project setup
Theme and color palette
Slide 1
Slide 2
Slide 3
Interactive checklist
Object states
Variables
Triggers
Completion logic
Summary layer
Navigation
Testing
Publishing
Each slide should have its own section.
Within each slide section, the AI should explain:
What the slide is supposed to accomplish
Which elements must be added
Where each element should be placed
Which colors and fonts should be used
Which interactive behaviors are required
Which states, triggers, layers or variables are needed
How to test the slide before continuing
This creates a direct path from the storyboard to the software.
Step 6: Break Every Action into Its Simplest Form
Do not allow the AI to write vague directions such as: “Add the appropriate triggers.” That instruction assumes the user already knows which triggers to add.
Instead, ask for instructions such as:
Select the checklist item labeled “Bring the red folder.”
Open the Triggers panel on the right side of the screen.
Select Create a New Trigger.
Set the action to Change State Of.
Select the checklist item as the object.
Set the state to Correct.
Set the event to When User Clicks.
Select OK.
The instructions should explain every click, selection, name, value and condition. This is especially important when the user is working in unfamiliar software.
Step 7: Add the Rationale the First Time a Process Appears
The tutorial should explain why a process is being used the first time it appears. For example: “Create a true-or-false variable for each correct action. A variable stores information behind the scenes. In this project, each variable will record whether the learner has selected one of the required responses.”
After the concept has been explained once, later steps can be shorter. For example: “Create the next true-or-false variable using the same process.” This keeps the guide educational without making every section repetitive.
Step 8: Put Each Step Inside an Accordion
A large tutorial can become overwhelming even when the instructions are accurate. Use an accordion format so each action can be expanded individually. A single slide might be organized like this:
Slide 3: Interactive Classroom
Accordion 1: Set the slide background
Add the classroom image, crop it to fill the slide and lock it so it cannot be moved accidentally.
Accordion 2: Add the checklist panel
Insert a panel beside the image. Apply the approved background color and add the checklist heading.
Accordion 3: Create the first checklist item
Insert the first selectable action, format the text, and create the correct and incorrect states.
Accordion 4: Add the first variable
Create the variable that tracks whether the learner selected the correct action.
Accordion 5: Add the trigger
Connect the checklist selection to the object state and variable.
Accordion 6: Test the interaction
Preview the slide and confirm that the item changes color and updates correctly.
This format allows the user to focus on one small task without seeing the entire development process at once.
Step 9: Include Visual Design Instructions
The guide should not focus only on technical features. Ask AI to include specific visual instructions based on the storyboard and reference materials.
For each slide, it should identify:
Background color
Accent colors
Font choices
Font sizes
Button styles
Image placement
Margins
Spacing
Alignment
Shape styles
Feedback colors
Hover and selected states
For example:
Use dark navy for the slide background.
Use white text for instructions.
Use green only for correct responses.
Use red only for incorrect responses.
Use the same rounded button style across all slides.
Keep the checklist panel aligned to the right side of the screen.
Maintain consistent spacing between checklist items.
This helps the final product feel cohesive rather than assembled one slide at a time.
Step 10: Include Checkpoints After Every Major Step
Each accordion section should end with a simple checkpoint.
Examples:
Confirm that the image fills the slide without distortion.
Confirm that the button changes appearance when selected.
Confirm that the variable changes from False to True.
Confirm that the summary layer does not appear too early.
Confirm that the Continue button remains disabled until all conditions are met.
The user should test each section before moving forward. This makes errors easier to find because the project is tested in small pieces rather than only at the end.
Step 11: Include Troubleshooting Inside the Relevant Step
Do not place all troubleshooting information in one large section at the end, instead add common problems directly inside the accordion section where they may occur.
For example:
Problem: The checklist item changes color, but the completion layer does not appear.
Check:
Is the variable changing to True?
Is the trigger checking every required variable?
Is the trigger placed after the variables are updated?
Are the variable names spelled correctly?
Is the completion trigger attached to the correct object or slide event?
This makes the guide more useful while the user is actively building.
Step 12: Ask for Diagrams When the Logic Becomes Complex
Written instructions are not always enough. Ask AI to create diagrams when several components must work together. For a Storyline interaction, a diagram might show:
Learner clicks an item
↓
The object changes state
↓
The variable changes to True
↓
The checklist displays a checkmark
↓
Storyline checks all required variables
↓
The summary layer appears
A diagram can help the user understand the system instead of simply copying steps.
AI can also create:
Slide maps
Trigger maps
Variable flowcharts
Navigation diagrams
Color palette examples
Screen layouts
Object placement diagrams
Step 13: Use Screenshots to Troubleshoot the Actual Build
When something does not work, upload screenshots of the current project.
Helpful screenshots include:
The slide
The timeline
The trigger panel
The variable panel
The object states
The layer settings
The player settings
Also describe:
What should happen
What currently happens
When the problem occurs
Which steps have already been tested
You can also upload a short screen recording showing the issue. Ask the AI to compare the current setup with the storyboard, tutorial and official documentation.
Step 14: Revise the Guide as the Project Changes
A storyboard may change during development. When a slide or interaction changes, update the AI with the new information. For example: “The checklist now includes ten options instead of eight. Six are correct. The learner may select incorrect options, but the course should still advance once all six correct options have been selected.” Ask AI to revise only the affected accordion sections. This prevents the full tutorial from becoming outdated.
Copy-and-Paste Prompt
Use the following prompt as a starting point:
I want to create a polished project in [software name], but I have limited experience using the program.
I already have a clear vision for the final product. I am uploading my storyboard, training materials, PDF user manuals, tutorial videos, screenshots, reference photographs, color palette, project notes and examples of the intended result.
Review all uploaded materials before creating the tutorial. Use the official manuals and training resources to verify the software instructions. Use my storyboard, images, notes and examples to understand exactly what I want to build.
Create a complete, beginner-friendly development guide that walks me through the project from start to finish.
Organize the guide:
In the same order as the storyboard
Slide by slide, screen by screen, or section by section
With each individual action placed inside its own expandable accordion
Break every action into the smallest practical steps. Tell me exactly:
What to click
Where to find each menu or panel
What to create
What to name each object, layer, state, variable, trigger, or file
What values or conditions to enter
Where to place each visual element
Which fonts, colors, sizes, and styles to use
What order to complete the actions
The first time you introduce a technical concept, briefly explain why it is needed and how it supports the project. After that, refer back to the established process without repeating the full explanation.
For every accordion section, include:
The goal of the step
The exact actions
The rationale, if this is the first time the process appears
What the completed step should look like
A checkpoint for testing
Common problems and how to fix them
Do not simplify the project into a basic beginner exercise. Help me build the full version described in the storyboard.
Do not invent software features, menu names, or capabilities. When the uploaded materials do not provide enough information, clearly state what needs to be verified.
Include:
Project setup instructions
A visual style guide
Slide-by-slide build instructions
Interactive element instructions
Variable, trigger, state and layer instructions
Navigation instructions
Accessibility checks
Troubleshooting guidance
A final quality-assurance checklist
Simple diagrams for any process that may be difficult to understand in text
The final guide should allow a new user to create a polished product that closely matches the original vision while learning the software through the development process.
Use the Same Method for Other Projects
This process is not limited to course-authoring software.
You can use it for:
Building a website
Creating an app
Editing a video
Designing a spreadsheet
Learning photography software
Repairing a toilet
Changing the oil in a car
Installing an appliance
Setting up home technology
Assembling furniture
For physical projects, upload:
The product or vehicle manual
Model information
Photographs
Videos
Diagrams
Replacement-part instructions
Safety information
Trusted tutorials
Then ask AI to create a step-by-step accordion guide for the exact project. For safety-sensitive work, verify the instructions against official documentation and consult a qualified professional when necessary.
